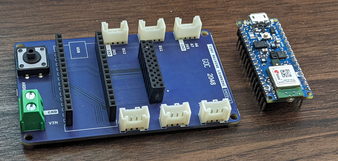
- Arduino Nano 33 BLE Sense board
- OV7675 Camera
- Arduino Tiny Machine Learning Shield
- USB A to Micro USB Cable
- HARDWARE Setup Instructions
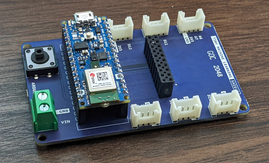
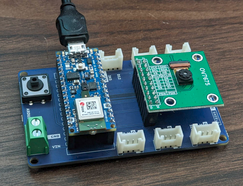
- If you are using the TinyML Shield
- Slot the Nano 33 BLE Sense board into the Tiny Machine Learning Shield.
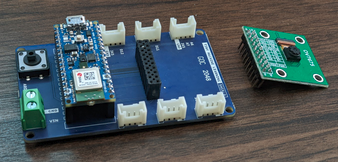
- Slot the OV7675 camera module into the shield using the same technique.
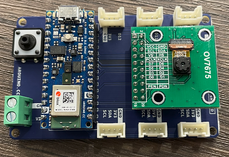
- Finally, use the provided USB cable (type-A to microB) to connect the Nano 33 BLE Sense development board to your machine.
- Slot the Nano 33 BLE Sense board into the Tiny Machine Learning Shield.
- Wiring Up Individual Parts
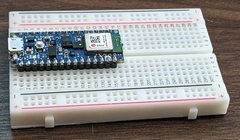
- Slot the Nano 33 BLE Sense board into a solderless breadboard.
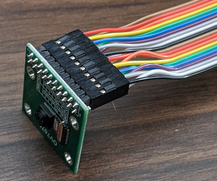
- Attach a few headers to OV7675 camera.
- Below we’ve mapped these OV7675 module pin numbers onto a fritzing (wiring) diagram for the Arduino Nano 33 BLE sense (assuming it is placed into a breadboard):
- Below is the general pinout for Arduino IDE
-
Pins should be connected as follows
- Table of Pins Connections
- Slot the Nano 33 BLE Sense board into a solderless breadboard.
- If you are using the TinyML Shield
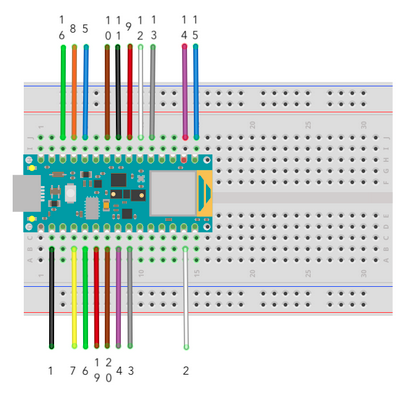

| Description | Camera Module Pin | Microcontroller Board Pin |
|---|---|---|
| VCC / 3.3V | 1 | 3.3V |
| GND | 2 | GND |
| SIOC / SCL | 3 | SCL / A5 |
| SIOD / SDA | 4 | SDA / A4 |
| VSYNC / VS | 5 | D8 |
| HREF / HS | 6 | A1 |
| PCLK / 3.3V | 7 | A0 |
| XCLK | 8 | D9 |
| D7 | 9 | D4 |
| D6 | 10 | D6 |
| D5 | 11 | D5 |
| D4 | 12 | D3 |
| D3 | 13 | D2 |
| D2 / 3.3V | 14 | D0/RX |
| D1 (may be labeled D0) | 15 | D1/TX |
| D0 (may be labeled D1)¹ | 16 | D10 |
| NC | 17 | – |
| NC | 18 | – |
| PEN / RST | 19 | A2 |
| PWDN / PDN | 20 | A3 |
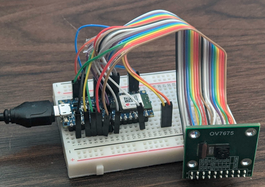
- Final Layout
Driver and Libraries Installation for Arduino Setup
- Install Dependencies
sudo apt-get update -y sudo apt-get upgrade -y sudo apt-get install -y wget sudo apt-get install -y tar sudo apt-get install -y curl - Download IDE and setup environemnt variables
CURR_DIR=$(pwd) INSTALL_DIR=${HOME} ARDUINO_VERSION=1.8.10 wget -N https://downloads.arduino.cc/arduino-$ARDUINO_VERSION-linuxaarch64.tar.xz --no-check-certificate tar -C $INSTALL_DIR/ -xvf arduino-${ARDUINO_VERSION}-linuxaarch64.tar.xz cd $INSTALL_DIR/arduino-${ARDUINO_VERSION} sudo ./install.sh ./arduino-linux-setup.sh "$USER" echo "You can delete the tar file if desired: arduino-"${ARDUINO_VERSION}"-linuxaarch64.tar.xz" -
A REBOOT WOULD BE NEEDED AFTER THIS STEP
- Download Arduino CLI
CURR_DIR=$(pwd) INSTALL_DIR=${HOME} ARDUINO_VERSION=1.8.10 cd $INSTALL_DIR curl -fsSL https://raw.githubusercontent.com/arduino/arduino-cli/master/install.sh | BINDIR=. sh sudo chmod +x arduino-cli -
Attach Camera, Shield to Arduino IDE
- Setup Camera to talk to Arduino and attach the TinyML Shield to Jetson Nano ``` CURR_DIR=$(pwd) INSTALL_DIR=${HOME} ARDUINO_VERSION=1.8.10 cd $INSTALL_DIR PORT=”/dev/ttyACM0” BOARD_NAME=”Arduino Nano 33 BLE” FQBN=”arduino:mbed:nano33ble” ARDUINO_CORE=”arduino:mbed”
./arduino-cli core install ${ARDUINO_CORE}
./arduino-cli config init
./arduino-cli config set library.enable_unsafe_install true
./arduino-cli lib install “Arduino_TensorFlowLite@2.4.0-ALPHA”
./arduino-cli lib install –git-url “https://github.com/arpit6232/arduino-library.git”
./arduino-cli lib install “Arduino_LSM9DS1@1.1.0”
./arduino-cli lib install “ArduinoBLE@1.2.0”
TEST_CAMERA_DIR=”${INSTALL_DIR}/Arduino/libraries/arduino-library/examples/test_camera”
./arduino-cli compile -b ${FQBN} ${TEST_CAMERA_DIR} -v
sudo ./arduino-cli upload -b ${FQBN} -p ${PORT} ${TEST_CAMERA_DIR} -v
sudo ./arduino-cli board attach serial:///dev/ttyACM0 ${TEST_CAMERA_DIR}
TEST_CAMERA_DIR=”${INSTALL_DIR}/Arduino/libraries/arduino-library/examples/test_camera”
- Check to see if the Camera is working by testing output over ```/dev/ttyACM0```
sudo stty -F /dev/ttyACM0 raw 115200 cat /dev/ttyACM0 > raw_points.txt ```